How to Make an Accordion Fold Book from One Sheet of Paper
Learn how to make an accordion fold book from one sheet of paper, with clear panel planning and folding advice for a neat, usable result.
The common mistake with an accordion fold book is treating each crease as decoration; the cost is a strip that buckles and panels that lose their order. To make an accordion fold book, plan the panel widths and reading sequence before you fold, so one sheet becomes a connected set of pages that opens as a display.
One continuous strip sets the reading pace
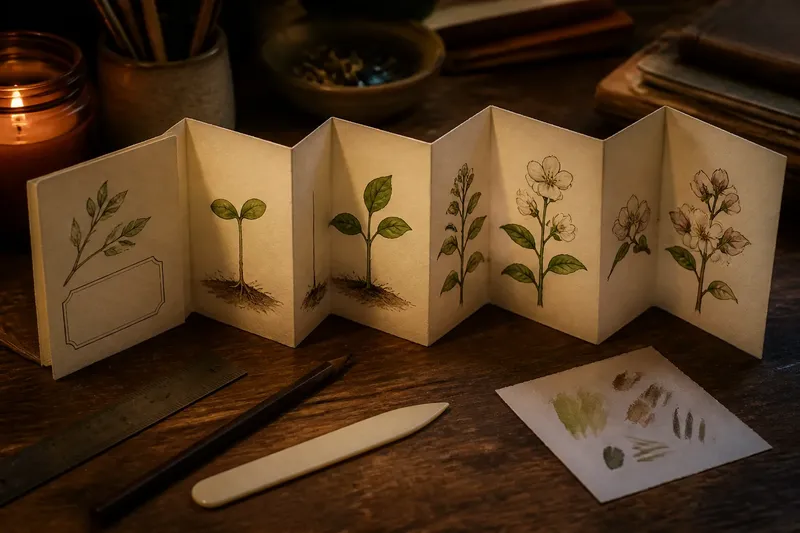
An accordion fold alternates creases in opposite directions along a strip of paper. From the edge, the folds make a concertina; opened out, they reveal joined panels in sequence. The paper stays in one piece unless you deliberately attach another section.
That connection suits small books, portable collections and tabletop displays. A reader can move from panel to panel or open the whole strip to see how its parts relate. Unlike separate cards, the panels cannot drift out of order, and the creases give the sequence a steady rhythm.
Each panel offers a bounded area for an image, note or small composition, while the folds let the work close into an object that is easy to hold. A single uninterrupted picture is less straightforward, since the creases cross its surface and may interrupt the image.
Choose paper that folds without fighting back
Ordinary drawing paper or light card is a forgiving choice for a first attempt. Very flimsy paper may curl or sag when opened, while heavy stock can resist the folds and build up at the hinges. Choose according to whether the finished piece should lie open, stand up or travel in a pocket.
If the paper has a noticeable grain, folding with it often makes a cleaner crease and reduces cracking. If you cannot tell which way the grain runs, gently bend an offcut near its edge in each direction; the more flexible direction is the better candidate. Keep the test light rather than forcing the paper.
A ruler and pencil are enough to mark the panels. A bone folder can sharpen creases, while a blunt scoring tool may help with firmer paper; try either on a scrap first so it does not scar or cut the surface. A cutting mat is useful if you need to trim the strip, but a craft knife is optional and should be handled with suitable care.
For a display, choose paper with enough body to support itself. For a small book that will be handled, a softer, thinner sheet may fold more comfortably. Paint and glue can change how paper bends, so test surface treatments on an offcut before decorating the full strip.
Plan the panels before folding
Decide what the paper object needs to do before dividing the strip. A small book of sketches can use compact panels; a display may need broader panels so its images remain easy to see. Draw a quick map of the intended order and mark the cover or opening panel.
Measure the usable length with a ruler, then divide it into equal sections with light pencil marks. If the ends do not divide neatly, either trim a little or give the end panels a deliberate role. An accidental narrow sliver is awkward to fold and difficult to use.
Say you have an offcut that you choose to treat as 30 centimetres long and want a small book of garden observations; these are invented planning values, not a standard size. You divide it into six equal panels, reserve the first for a title and sketch a leaf on each of the remaining five. You fold at the marks, alternating direction, then open the strip flat: the leaves form a sequence across the joined panels, while closing it restores a compact book with the title at the front.
Fold in a steady sequence
Clear the work surface. Gather the paper, ruler, pencil, bone folder and an offcut for testing. Decide whether the finished piece is a book or display, and leave enough clear space to open the strip without catching it on tools or wet materials.
Mark the divisions. Measure from one short edge and make light pencil marks. Compare the final mark with your plan before folding; if the last panel would be an awkward sliver, adjust the panel plan or trim the strip now.
Make the first crease. Bring one edge to its mark, align the corners and press from the centre towards the edges. Use the ruler to keep the fold straight, then run a bone folder gently along it if the paper responds well. Check that the edges meet before using this crease as the guide for the rest.
Alternate each fold. Fold the next panel in the opposite direction, then repeat along the strip. If a fold slips, open that section and realign it instead of pressing a crooked crease into the sequence.
Check the finished structure. Open and close the strip slowly, watching for panels that twist, creases that gape or edges that catch. If the panels do not align, correct the fold while the paper remains flexible; a deeply pressed crease is difficult to move without leaving a mark.
Add decoration only when the folds behave. Draw, write or collage with the strip supported flat, and let wet materials dry before closing it. Keep bulky layers away from the hinges so they do not make the joints stiff.
Use the folds to organise a story or display
A concertina can organise information without a conventional front and back. Show a plant changing from seedling to flower, or pair small images with short captions. A repeated motif can cross the folds, while separate moments can give each panel its own character.
For a display, open the strip into a shallow zigzag on a desk or shelf so the panels support one another. A broad opening creates a wider sweep but may be less stable; a tighter zigzag takes up less space and feels more enclosed. Try the arrangement on the surface where it will sit.
A small book can use both faces of the strip. Before adding content, sketch the reading order and note where the reverse side begins; the sequence depends on how the strip is turned. Keeping this simple map nearby helps prevent an unexpected jump when the book is flipped.
What should you know before making an accordion fold book?
How is an accordion fold different from separate pages?
The panels stay joined in one continuous strip, so the paper itself keeps them in order. The object can close like a small book and open into a connected display.
Can you make an accordion book without special tools?
Yes. A ruler and pencil can mark the divisions, and careful hand pressure can make the folds; a bone folder is helpful but not essential.
Why are the panels buckling or refusing to lie flat?
The panel widths may have drifted, the folds may not alternate consistently, or the paper may be too soft for the display. Open the strip on a flat surface and check the alignment before adding decoration; if the paper is very limp, choose sturdier stock for another version.
What belongs on the first panel?
A short title, small image or simple mark can orient a reader. If the piece is meant as a display rather than a book, the first panel can instead provide a visual starting point.
Check each choice before adding more material
- Check whether the paper bends more readily in one grain direction; if one direction flexes cleanly, fold with it, but if neither does, test a different offcut before committing the full strip.
- Check whether the panel marks divide the usable strip without leaving a narrow end; if they do, proceed, but if they do not, revise the widths or trim the strip.
- Check whether the first crease lines up at both corners; if it does, use it as the guide, but if it does not, open and realign the paper before pressing harder.
- Check whether successive folds alternate direction; if they do, continue, but if two neighbouring folds face the same way, reopen the latest panel and correct it.
- Check whether the folded strip opens without twisting or catching; if it does, begin decorating, but if it does not, inspect the panel alignment and correct the fold first.
- Check whether paint, glue or collage makes an offcut stiff at its crease; if it stays flexible, use that material sparingly on the main piece, but if it stiffens, keep it away from the hinges or choose a lighter medium.
Keep the hinges flexible as the work grows
Treat each crease as a hinge rather than a place to pile material. Pencil, ink and light paper additions usually leave a fold more flexible than thick card, raised embellishments or a heavy coat of paint. Place a large image’s main detail away from the crease, and let only a light background shape cross it if the joint can bend freely.
When the object is finished, close it gently and store it flat or in a simple paper sleeve. If it is on display, reopen it slowly and adjust the zigzag instead of pulling the ends apart. The accordion fold book works best when each panel has room to do its job, including the occasional blank panel that lets a sequence pause.